Table of Contents
UPDATE: Click here for a more recent version of this tutorial with FullHD & 60 fps video support!
Introduction
Who doesn’t know about CounterStrike: Global Offensive (CS:GO)? It’s the latest installment of the eagerly-known CounterStrike first-person shooter video game series by Valve Entertainment Software, played by millions of players worldwide. In the unlikely case you never heard about it, you can read some informations on Wikipedia, on the CounterStrike Community Wiki and/or on the official website.
If you found this article you most likely know what the game is about and, most importantly, you’re well aware that you can use the game recording interface to save the replays of all your matches in your hard-disk drive: technically they will be stored into a lossless proprietary format (DEMO files, with .DEM extension) which can only be played from within the game.
What’s if you want to make a video containing your best moments / highlights and maybe upload it on YouTube? You’ll have to convert one or more .DEM files into a video container file – such as AVI, MP4 and so on. This guide will show you exactly how to achieve such result without using external programs such as FRAPS, HyperCam, BandiCam, DXTory and so on.
Why not use external programs?
Because there’s no reason to do that. You don’t want to use a screen-capturing software when you can avoid to, because you will definitely lose some of your video quality during the process. You can jump this step because the CS:GO engine has its very own fully-featured, built-in video recording mechanism that can easily handle the conversion task: you just need to learn how to properly use it.
Step 1. Install a (Lossless) Video Codec
First thing you need to do is to install a proper Video Codec to your system. You’re free to use anything but I strongly suggest you to use a lossless Codec, so you won’t lose any quality from the whole conversion process. The best choice by now in terms of performance/quality is probably the Lagarith Video Codec: you can download it for free from their official website. Alternatively you can also use HuffyUV, DivX, X264 or any other codec of your choice, expecially if you know what you’re doing – if you don’t, just get Lagarith and use it: you will hardly regret that choice.
Step 2. Locate your Demo(s)
If you are reading this you most likely already have one or more .DEM files you want to convert: if you do, jump to Step 3, otherwise you’ll need to get one. The most common way to do this is to download one of your already played games using the WATCH -> Your Matches tab, like shown in the screenshot below.
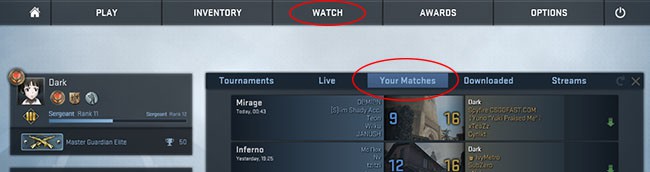
Right-click to one of your matches and select download to save it to your local hard-disk drive.
Step 3. Copy your .DEM file(s)
You need to place the DEM file(s) you want to convert in the game’s root folder, which is something like /Steam/SteamApps/common/Counter-Strike Global Offensive/csgo/ . If you’re using .DEM files coming from Your Matches, you most likely just need to move or copy them one level up, from /Steam/SteamApps/common/Counter-Strike Global Offensive/csgo/replays/ to /Steam/SteamApps/common/Counter-Strike Global Offensive/csgo/. Be sure to move both the .dem and the .dem.info files.
Step 4. Boost your Graphics
Before starting the conversion you need to be use that your DEMO will be reproduced using the proper settings and with the best quality your system can handle. In order to do this, launch the game and go to OPTIONS -> Video Settings.
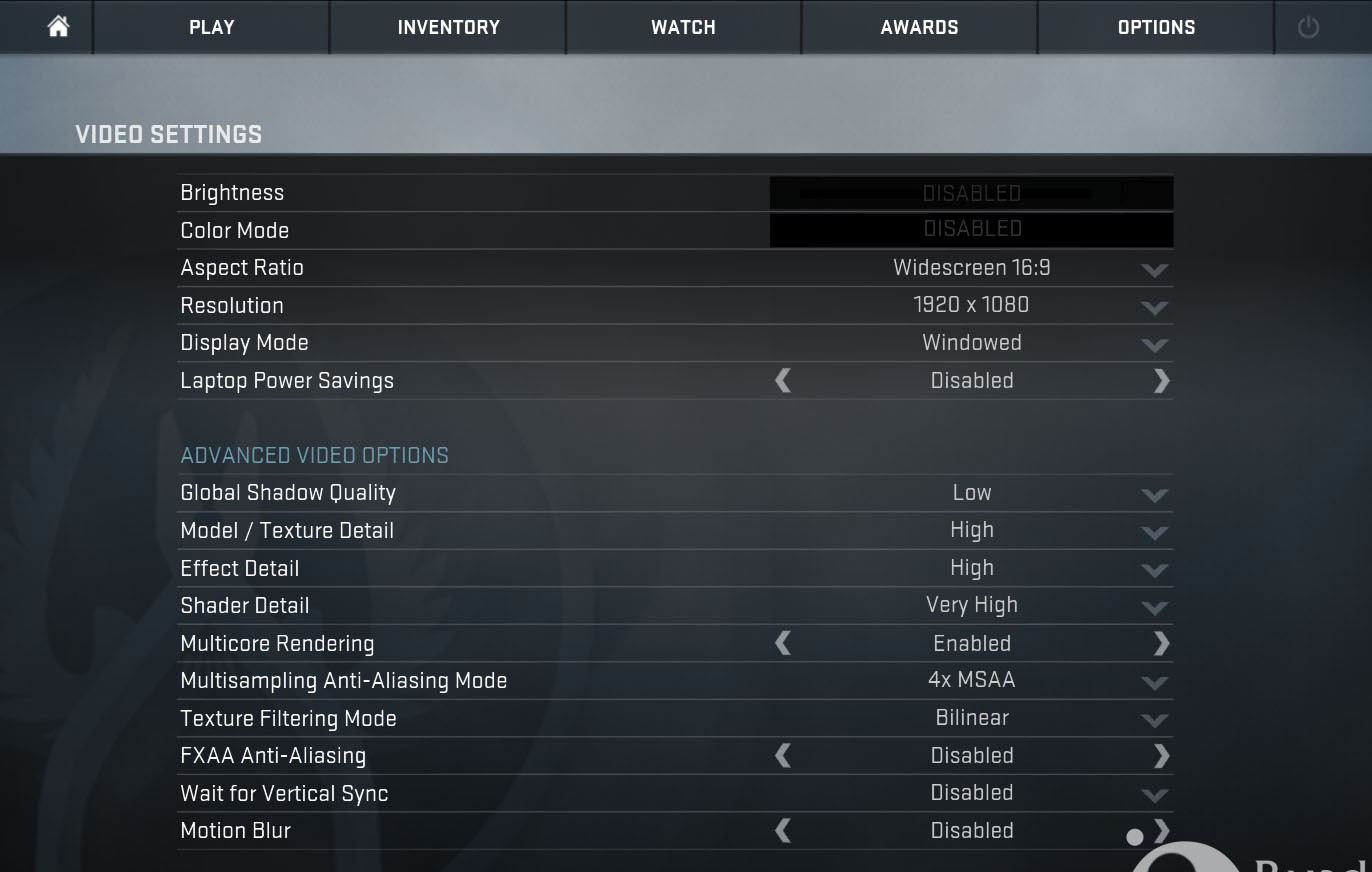
Be sure to set the following:
- Maximum video/effects quality: shadow quality, texture detail, effects detail, et. al. should be all set to High.
- Adeguate resolution, such as 1920×1080, assuming you want a Full HD video.
- Windowed Mode: we need it to conveniently choose the codec – see below.
Step 5. Issue the Console Commands
In order to use the built-in Source Recorder – which is the name of the internal mechanism we talked about a while ago – you need to bring out the CS:GO Developer Console, which can be activated at any time by pressing the tilde [ ~ ] keyboard key, or the [ \ ] key for italians keyboard. If you want to know more about the Developer Console you can click here, otherwise keep reading.
Once you brought out the Console, you can set-up your video conversion by issuing the following commands:
sv_cheats 1
host_framerate 30
startmovie demo01_avi avi
playdemo <choose_demo_file>
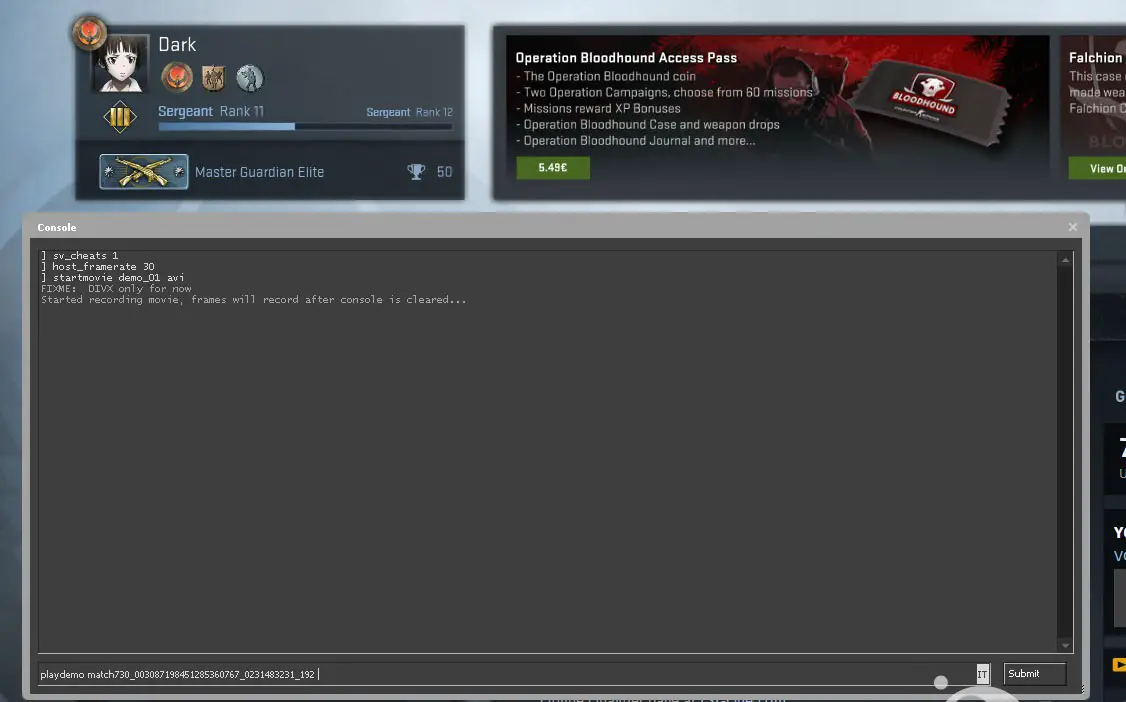
You will notice a couple things:
- As soon as you type the third command and hit the Enter key, a popup window will appear from which you’ll be able to select the Video Codec to use: you can choose Lagarith (as explained on Step 1) or any other codec you have installed.
- As soon as you type playdemo followed by a space, an auto-complete feature will show up displaying all the .dem files currently present into your root /csgo/ folder – which is you should have put the file(s) you need to convert in Step 3. Just choose the one you want to convert and press the Enter key to start playing the demo.
Step 6. Full playback or Director mode
You have two choices: fully playback (and thus convert) your demo from start to end, including warmup, or jump to specific rounds/moments using the demo player’s Director mode. If you choose the first option, just go AFK for a while; if you choose the latter, press Shift + F2 and manually perform your cuts & jumps. If you want, you can also use the Demo Smoothing ability, just press the Smooth button on the menu. If you don’t know what smoothing is, let me tell you: it’s basically making key spots and using them controlling the ingame camera to go wherever you wish it to. That way you can get nice angles, odd camera movements, etc.
As soon as your demo playback ends, or at any time you want to stop the conversion, bring out the console again and type the following command:
endmovie
Or just quit the game. As soon as you do that, you’ll have your demo_01.avi file ready to use in your root /csgo/ folder containing all your efforts. You can then use it raw or edit/postproduce it using any Video Editing Software like Sony Vegas, Adobe Premiere and so on.
That’s basically it. Happy Playing!
UPDATE: There’s an most recent version of this tutorial available for FullHD, 60 fps video: click here to read it!

Thank you for the guid Dark.
Useful articles never expire!
I LIKE THE GAME
My recording is without sound and it goes faster than usual. How can I fix this?
SHIFT+F2 and modify the demo settings
Problem here. Instead of full avi file it does many .tga files and wave soundtrack. I have different codec than Lagarith, but i think it is not a source of a problem
I did everything in this twice but the avi file still hasn’t shown up in my root folder…
Same here…
Ok, I found it.
It saved the file to:
SteamsteamappscommonCounter-Strike Global Offensive
Instead of:
SteamsteamappscommonCounter-Strike Global Offensivecsgo
How can I play back the video? It seems VLC doesn’t support Lagarith.
Lagarith is supported by VNC since v2.0.0.
Source: https://trac.videolan.org/vlc/ticket/2876
This takes up way too much hard drive space, and uses the same amount of time as it takes to record with screen recording software. I did this method for 3 seconds to test it out, and 3 seconds of recording was 105MB of data. So every 30 seconds will be a gig lol. No thanks. I’d rather use Bandicam where i can get 30 minutes of footage for a couple gigs.
Hello,
Actually there’s no difference in size between Bandicam and this method, as it mostly depends to the codec you use. WIthin this method I suggested to use a LOSSLESS codec because I like to have a *LOSSLESS* footage that I can then compress to achieve your desired quality. You can use any LOSSY codec (with this method OR with Bandicam) to achieve much smaller files 🙂
can you just do a video on this? im lost
Hello,
sadly I have no time for doing a video, but I made an updated post with a simpler technique to achieve a better result:
Check it here:
https://www.hanahaki.com/en/csgo-video-making-tutorial-from-demo-replay-files/
Thanks! But I do this and my game drops so many frames! it goes from 48~50 when playing, down to 5 while doing this! Am I doing something wrong? Is My computer just a potato?
You’re doing fine, the slowness you’re experiencing won’t affect your recording at all. It’s just normal, the recording session slows down the game a lot as it is resource intensive and usually takes a wide amount of time.
P.S.: Check the updated version of this tutorial here: https://www.hanahaki.com/en/csgo-video-making-tutorial-from-demo-replay-files/