This tutorial, split into three parts, explains how to release a FullHD, 60fps Youtube-ready video from one or more CS:GO Demo / Replay Files.
In the Part 1 we talked about hardware and software requirements, explained how to properly configure the environment in order to obtain a consistant, top-notch quality raw recording of a specific game action sequence made of a single WAV file and a vast amount – 1 for each frame – of uncompressed TGA files. In this Part 2 we’ll learn how to convert these recordings into single AVI files and how to import them into a video-editing software such as Sony Vegas. Eventually, in the Part 3, we’ll address some common issues and also see how we can improve this technique by configuring our system in order to save some valuable time for most of the steps.
By following the required steps you’ll be eventually able to create FullHD, ultra-smooth 60fps game videos just like the following one:
Step 6. Converting into AVI using VirtualDub
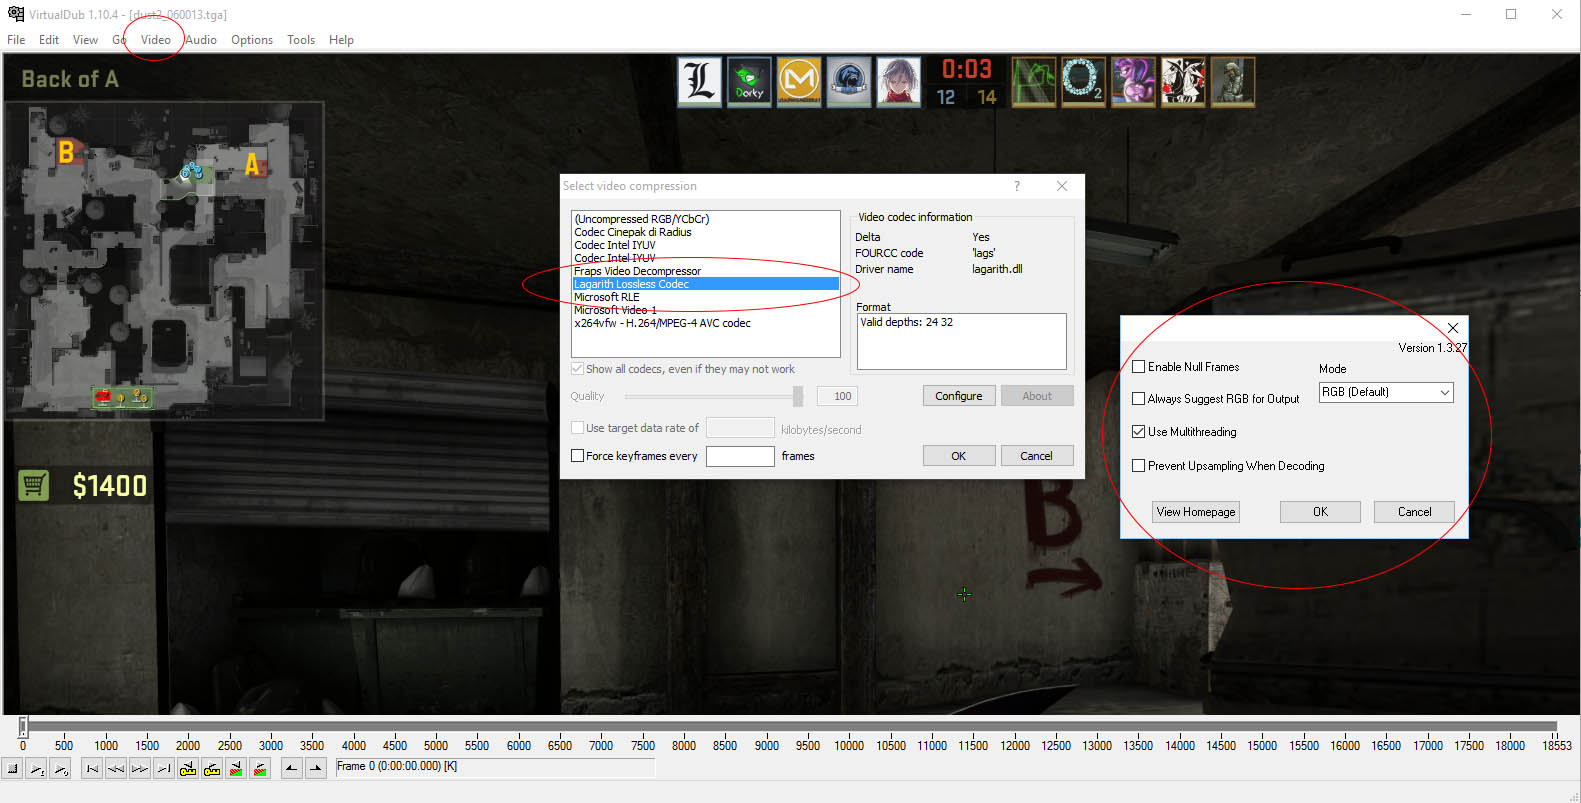
Launch VirtualDub, then click on File > Open Video File. Select the recording’s first frame – the TGA file having the lowest incremental number in its filename: the software will take care of loading all the subsequent siblings. Click on Video and select Full Processing Mode: then, again in Video, select Compression.: a pop-up window will be opened. Choose the compression codec you wish to use: select the Lagarith Lossless Codec, assuming you previously installed it, then click on Configure: another pop-up will appear. Disable all the checkbox but Use Multithreading, which has to be checked, then select RGB (Default) from the drop-down list, as shown in the following screenshot:
Click to OK and close the windows, then go to Audio > Audio from other file: another pop-up will appear: select the WAV file generated at the end of Part 1, Step 5. Now you need to choose between leave it uncompressed or compressing it just like you did for video:
- To leave the file uncompressed, click on Audio > Direct Stream Copy, which is the default options.
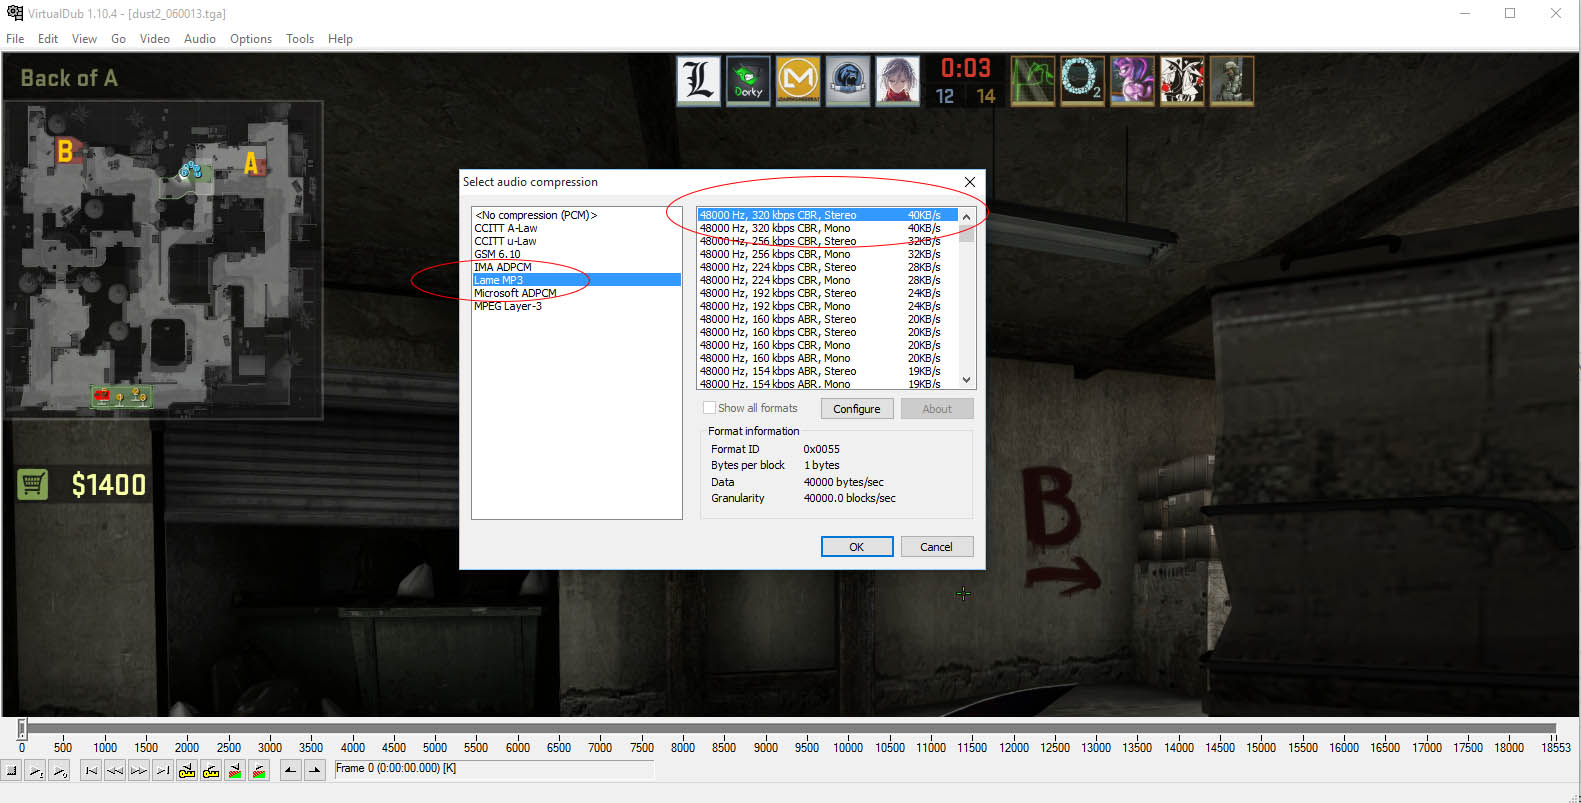
- To compress the audio, select Audio > Full Processing Mode then go to Audio > Compression and select a 44.100 320Kbps mp3 file (or anything similar to it).
Keep in mind that, size and performance wise, audio compression isn’t a big deal as video compression actually is: enabling it will save some valuable megabyte, but since we’re talking of Gigabytes and Gigabytes of video data you most likely won’t even notice it. If you still want to do that, we strongly suggest to use the Lame Mp3 Encoder, available through SourceForge. Again, keep in mind that it isn’t required at all – like always, the choice is up to you.
Now that we loaded either video and audio into your VirtualDub project, you only need to sync the two streams by saving them togheter into a resulting AVI. Click to Video > Frame Rate… and, in the pop-up windows, check the “Change so video and audio durations match” option (first radio button groups, third option from the top). If you did everything right, you should read the same frame-rate used for the recording (cfr. Parte 1, Step 5): for example, if you followed our settings, it would be 180.
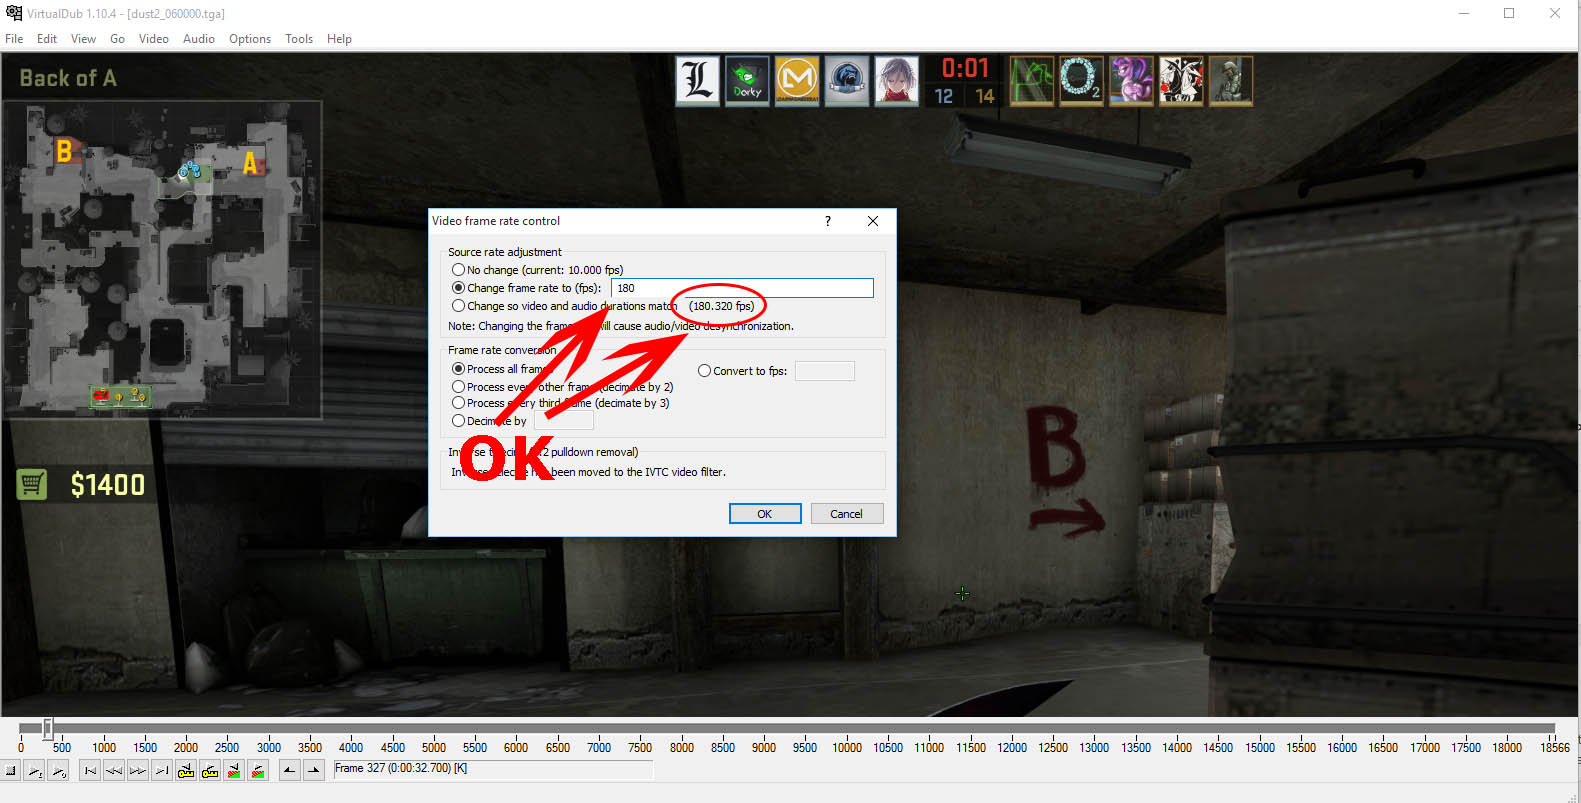
When looking for that group remember to consider the integer value, ignoring the decimal part. If the numbers do match, select the option 2 – change frame rate to (fps) – and input the integer value, leaving out the decimals. If they do not, well… something didn’t went like it should. Check if you did pick the right TGA – the one with the lowest incremental number – and/or the corresponding WAV file. If you’re sure you already did, check the bottom right number in the VirtualDub timeline, which shows the total number of frames for the current recording. If the number is 10000 (ten thousand), you hit a common issue: jump to the Part 3 of this tutorial to understand what happened and, above all, how to fix that.
Once you properly set the correct frame-rate, click to File > Save as AVI… and choose the path to save the resulting AVI file. I strongly suggest to avoid using the same folder containing the TGA + WAV files, for is best to keep them separated. Press OK and sit tight, the process will take some minutes. Once done, all your efforts will be stored into a single, yet huge AVI file with lossless quality and a gigantic frame-rate: in other words, a great source clip for our video project, waiting to be imported in our Sony Vegas project… even if it doesn’t exist yet.
Step 7. Setup the Sony Vegas Project
This step can be done independently from the previous six and only once for each resulting video, whilst Steps 1-6 shall be repeated for each and every source clip you want to prepare.
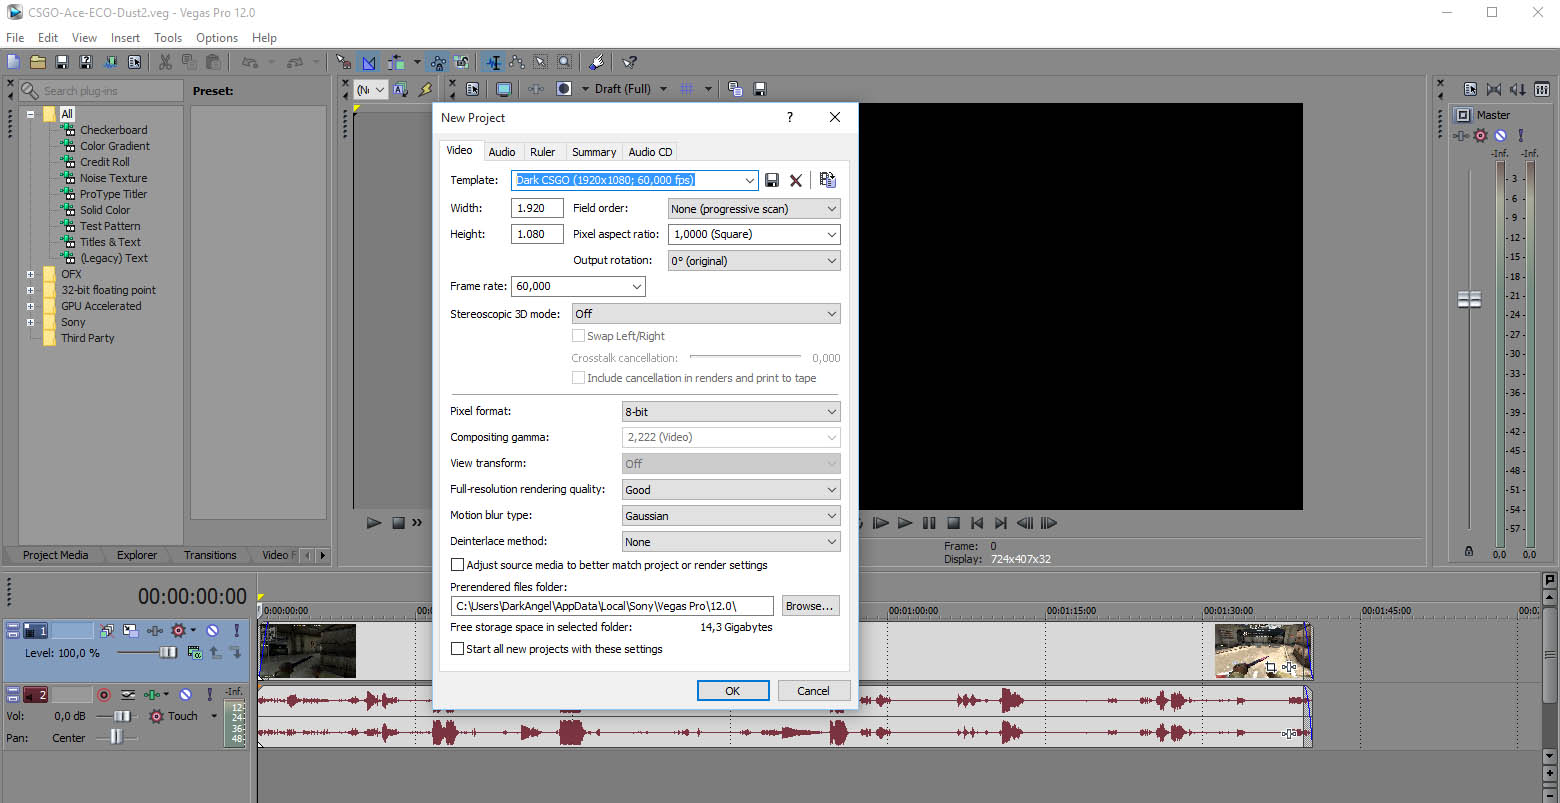
Open Sony Vegas, click to File > New… and, in the pop-up that will open, change the default settings to match the following:
- Width e Height: the resolution you used in CS:GO to record the source video, es. 1920 x 1080.
- Frame Rate: the FPS of the resulting video you’re working on, es. 60,000 for 60fps.
- Pixel format: 8-bit
- Full-resolution rendering quality: Good or Best (no substantial differences).
- Motion blur type: Gaussian
- Deinterlace method: None
IMPORTANT: these config settings are meant for Sony Vegas, which is the video-editing software I suggest you to adopt for CS:GO since it’s easy to use and has great presets for gaming video projects in general: nonetheless, they can be easily adapted to be used with any video-editing software settings (such as Adobe Premiere), as long as it has the same features.
Step 8. Importing AVI clips
This step is extremely simple, assuming you did everything properly: drag & drop the clip(s) created during Steps 1-6 inside the Sony Vegas timeline: each one will be placed inside a video track and a corresponding audio track. If you got a good eye you will see that sometimes the audio has a slightly different size than video, due to the fact that the endmovie command used in Part 1, Steps 4 & 5 isn’t always able to cut video and audio at the exact same time: remember the decimal numbers in the frame-rate popup window at the end of Step 6? Luckily enough, since we manually set the VirtualDub’s frame-rate for it to be identical to the host_framerate previously issued by the console during the recording phase (see Part 1, Step 4) the audio should be in sync up to the last bunch of frames: if they bother you, just cut them out using the Sony Vegas cut tool (hotkey is S).
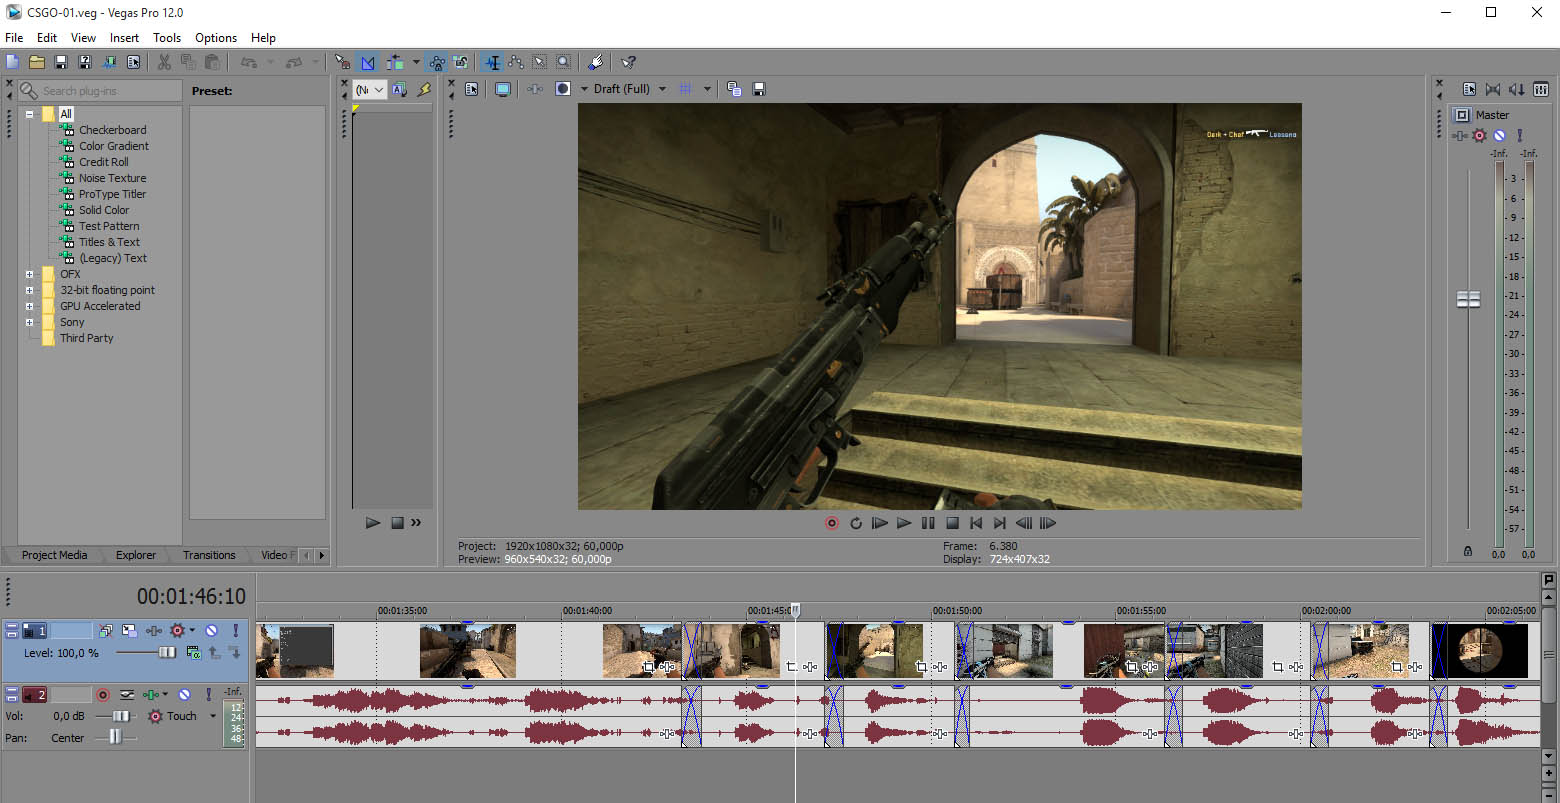
Notice that Sony Vegas will automatically interpolate the 180 fps source clips to the 60 fps specified in the project settings: on top of that, it will also perform the task in a really accurate, smoothing and good-looking way. This is the main reason because I strongly suggest to use Vegas, as doing it manually can be tricky and might even require additional third-party software you’ll have to install, configure and understand.
As soon as your clips are in your timeline, you can perform your montage: you can cut, shrink, expand, merge and add text and/or effects at will. If you’re good at editing video, this will be the most fun and interesting aspect of the whole process. If you’re not, don’t worry: all you really need to do in order to pull off a decently-looking CS:GO video is to place the various clip one after another: you can also overlap them by a very small amount of frames (15-30 or more, up to your taste) if you want the video to smoothly switch between them using a cross-fading effect.
Step 9. Finalizing the outcome
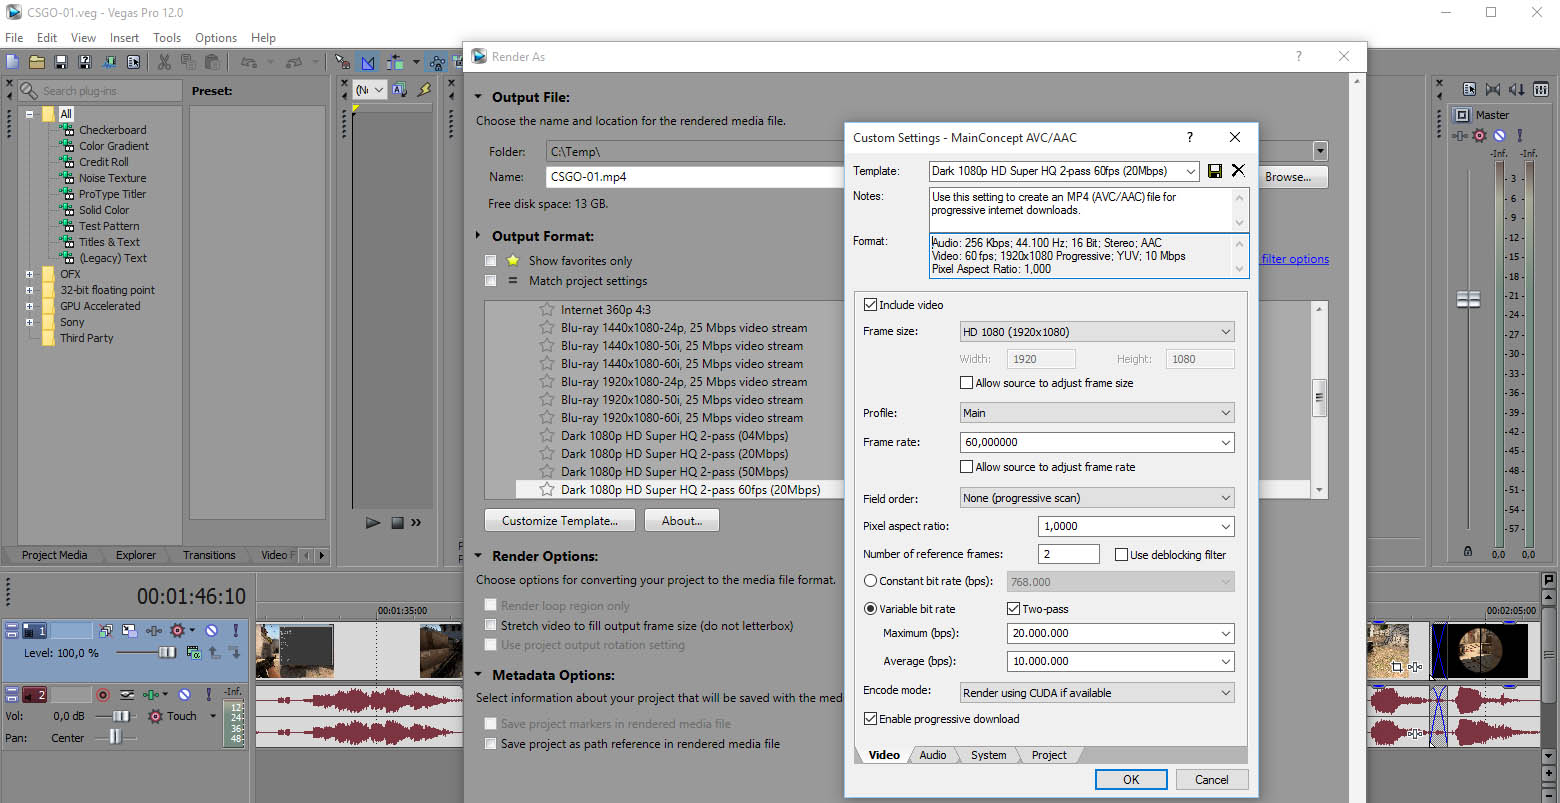
When you’re satisfied with the result of your efforts, click on File > Render As… to open the rendering pop-up window. From there you can choose where to store the resulting video and which codecs/effects/settings to use. You can either select a preset template among those already present or create a new one by yourself. These are the settings I used to create the sample video file shown at the beginning of this post:
- Codec: AVC/H264/AAC
- Audio: 256 Kbps; 44.100 Hz; 16 Bit; Stereo; AAC
- Video: 60 fps; 1920×1080 Progressive; YUV; 10 Mbps
- Pixel Aspect Ratio: 1,000
- Compression Settings: Variable Bitrate, Two-Pass encoding, Max 20.000.000, Min 10.000.000
- Other Settings: Render using CUDA if available, Enable progressive download.
These settings dimensioni non esagerate: se avete una buona banda in upload potete tranquillamente raddoppiare o quadruplicare i bps così da ottenere risultati ancora migliori.
Step 10. Uploading to Youtube
I don’t think we need to explain how to upload your newly-created movie to Youtube: if you never did something like that, just spend some minutes by reading the Youtube official guide for uploading videos. Right after you do that, check that your video’s full resolution and framerate will be available: notice that it could take a while, since the various formats are added as soon as the Youtube encoder process them, starting from the lowest-quality one. If you feel like something isn’t going on like it should – such as either the FullHD and/or the 60fps versions are missing – try to render your project again – maybe changing a couple settings – and then to repeat the upload.
That’s all for now. In the Part Three of this tutorial we’ll see how we will address some common issues – such as the “infamous” VirtualDub 10.000 frames glitch – and see what we can do in order to optimize the process described in Steps 1 through 6, possibly saving some valuable time.
Continue to Part 3

Where is the part 3 please?
i wanted to ask does normally the avi file takes up to 2 gb data for 2 minutes video?
VirtualDub’s 10000 frames problem
What is this?
Very old VirtualDub issue: don’t know if they fixed it yet, however it was still there when I wrote this guide.
Take a look here:
https://facepunch.com/showthread.php?t=1073856
(and Google for it as well)
Looks like Lagarith Lossless Codec doesn’t work under Windows 10. I was not able to install it. And it was updated in 2011 last time. Any ideas what I can use insread?